Introduction
Recently, I became interested in BGP hijacking attacks. The inspiration for the topic came from Hack the Box machine named Carrier. In the machine, I had to carry out a BGP hijacking attack to steal credentials and obtain root. I wanted to set up my own replica of the machine to better understand routing and BGP hijacking attacks. The following post will cover the steps of this demo set up.
What is a BGP Hijack?
To start off, let’s define what a BGP Hijack is. What is a BGP hijacking attack? A BGP Hijacking attack “is the illegitimate takeover of groups of IP addresses by corrupting Internet routing tables maintained using the Border Gateway Protocol (BGP).”
BGP Hijacking in Real life
There are several real world examples of BGP Hijacking attacks that have adversely impacted companies. For example, in 2018, a BGP hijacking attack was carried out to steal 17.3 Million dollars of cryptocurrency from MyEtherWallet. For this reason, BGP Hijacking should be further investigated.
The Scenario
For my demo, the scenario I set up consisted of three routers, a user host, and a ftp server. The goal of this demo was to MITM the traffic the user sends to the ftp server by using a BGP hijacking attack.
The Materials
To set up this demo, I used the following materials:
- Docker
- To set up the 5 hosts needed
- Create 3 virtual networks
- Quagga
- Virtualized routing software to set up BGP network
- Iptables
- To route packets to and from user, and ftp servers
- Network Utilities to Test
- Ping
- Traceroute
- ifconfig
Setting up the Demo
First, I installed Docker using apt

Once the software was installed, I ran docker run hello-world to confirm it was working.
Create Router Image
Next, I created my router image. For the routers, I used the ubuntu:16.04 container image. While I was testing, I found this version of ubuntu the easiest to use. I used the following commands to pull the image from the docker hub:
Docker pull ubuntu:16.04
Next, I created an ubuntu docker container to use as my router image.
Docker run --privileged -itd ubuntu:16.04
This command creates and runs one container in the background. To access the ubuntu command line for each of the routers, I used the command docker container ls to look up the container name and the command docker exec -it --privileged <container name> bash to enter into a shell on the container.
Set up the Routers
Install software
To set up the routers, I installed the following software:
- Quagga
- Vim
- Net-tools (ifconfig)
- Iputils-ping (ping)
- Traceroute
- Iptables
- tcpdump
Before installing any software, I ran the command apt-get update.
Next, I ran apt-get install <software> to install the software.
Following this step, I saved the image of this container so that I do not have to redo these steps for the other containers. To do this, I exited the container session by typing exit in the command line and saved the image by typing docker commit <container ID> bgphijack/baseimage:v1

Configure router
Now that all the tools were ready to go, I was able to move onto my next step: configuring the router.
Quagga Config Files
Before running the software Quagga, it required me to set up the config files. In order to do this, I copied over the quagga supplied example config files.

The zebra daemon provides an abstraction layer to the kernel calls. It uses zserv, which is the client that communicates routing protocols to the zebra daemon.
Vtysh is a CLI which allows control of the daemons and carries out most administration tasks.
The bgpd.conf file controls the bgp configs I’ve used for the demo.
For more information on the quagga tool, visit: https://www.quagga.net/
Change Ownership and Permissions
Once I copied over the files, I modified the ownership and permissions of the files.
In order to do this, I used the following commands:
chown quagga:quagga /etc/quagga/*.conf
chmod 640 /etc/quagga/*.conf
Edit Config Files
Next, I edited the config files. I used vim to edit /etc/quagga/daemons, changing the option for zebra and bgpd daemons from ‘No’ to ‘Yes’. This allowed me to run those daemons upon booting the software.
Finally, I edited the bgpd.conf files for the router image. The bgpd.conf file for each router were different, as expected. In order to understand the additions to the configuration files, let’s briefly go over some basic routing terminology.
BGP Terminology
BGP (Border Gateway Protocol) is an exterior gateway protocol. An exterior gateway protocol is a routing protocol which exchanges routing information between Autonomous Systems.
An Autonomous System (AS) is a collection of IP’s otherwise known as prefixes or subnets, which is owned by an entity (company, university, etc.). Autonomous Systems establish Border Gateway Protocol sessions with other AS in order to exchange their prefixes with one another. These routers collect this prefix information– by doing so, they know where to forward a request to a particular IP. Routers can specify which routers they want to share their IP’s with by defining its neighbors. Routers can gain access control lists with their neighbors called “route-maps.” This allows them to permit or deny sharing different routes to those respective neighbors.
Okay, let’s go back to the config files.
First, I specified the router and its ASN (Autonomous System Number). Underneath that router definition, I declared the networks– which are behind that router (for now, it will be just the router itself). Next, I defined the neighbor routers and the route maps.
Edit Config Files Continued…
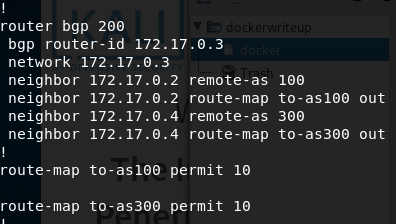
Below is an example of the first routers bgpd.conf file:

Under router bgp 100, the lines below specify the router ip address, and the network behind the router. Following this are the neighbor statements. The neighbor 172.17.0.3 remote-as 200 specifies that ip as remote autonomous system named by the number specified.
The neighbor route maps specify that when the router receives a route from that neighbor, the router will use the to-as### route-map policy. The route-map policy sends the routers prefixes out. In this case, the filter permits those routes so those routes or prefixes will be received by those AS neighbors.
The route map policies have numbers at the end. They are how one orders the policies.
This concludes the basic setup for the router image. To save time setting up the routers, I committed the image and exited the docker CLI. I typed the command exit and committed the image with the command docker commit <containter ID> bgphijack/router:v1
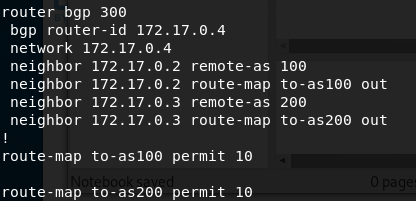
Create Two Other Routers
The bgpd.conf files for the other routers requires the same steps, but entails a few minor changes– switching out the IP’s and ASN’s.
Once this all set up, Quagga can be initiated. To start the program, I typed in the command /etc/init.d/quagga start for each router. Once all of the routers started, were up and running, I checked to see if the bgp session was successfully created. To do this, I typed vtysh into the terminal and entered into the router CLI. Once the CLI was ready, I typed show ip bgp neighbors. This shows the messages sent and received. If all routers have received ‘keep alive messages’ from each other, then this signifies that the routers are set up successfully.
Add Networks Behind Routers
Next part of the setup requires adding two additional networks that can host the user and ftp server. Fortunately, with the docker, this was quite easy! To do this, I used the command docker network create <name>.


Create User and FTP Server
Now that the two networks have been created, I created the user and FTP server. I used the command docker run --net <network name> --privileged -itd ubuntu:16.04 to create two more containers.
Bridge New Networks with Routers
After the new resources were created, I connected the new networks to the routers so they are able to route to the newly created hosts. Using Docker again, I used the command docker network connect <network> <container name>.
This command bridges the network into a second interface on the router. I bridged both the user and ftp server, as well as the routers in front of those networks so that traffic can flow between the user and ftp server.
Update bgpd.conf Files
Once the networks were bridged with the routers, I added the networks to the bgpd.conf file so that the routers could advertise those routes. For each router connected to the user and ftp server, I opened bgpd.conf. I added the additional network line below the router. The network is composed of a /16 subnet, thus, I added the entire subnet for each respective router. After doing so, I restarted the routers by using the command /etc/init.d/quagga restart.
Bridge two interfaces on routers
In order to finish setting up the network, I set up post routing rules between the two interfaces on the routers, user, and ftp server using Iptabes. This allows communication between the user and ftp server. To set up the post routing rules on the routers, I used the following command:
iptables -t nat -A POSTROUTING -o eth1 -j SNAT --to <ip of the router eth1>
Edit Routing Tables
Finally, I fixed the default routing tables for the user and ftp server so that traffic gets routed to the routers I have set up. To do this, I used the command ip route show to see the default routing table. Next, I deleted the current default route and replaced it with the ip of the router. This was done by using the command:
ip route del default via <ip> eth0
ip route add default via <ip of router> eth1
Use these commands for both user and ftp server containers. This should complete the demo setup! To test if it is working correctly, use ping or traceroute to connect with the ftp server using the user.
Conclusion
To summarize, the demo setup consisted of downloading the docker, creating & configuring that router image, installing the software, and finally setting up two containers to simulate a user & ftp server.
If you are interested in learning more about the logistics of an actual BGP hijack attack, please refer to part II of the blog. I will be covering hijacking a subnet, via utilizing stolen credentials and creating middle man attack using BGP.

One thought on “BGP Hijacking: Demo Setup”